Fixing Overscan on a 24" ViewSonic VX LED Monitor
29 August 2012
To free up some monitors with DVI ports for our Dell-using developers at Headspring, I was recently upgraded to a pair of ViewSonic VX2453mh monitors. Overall, I’m very impressed with these screens: the colors are vibrant, the response times are excellent, and the input ports are conveniently-located. However, after hooking them up to my MacBook Pro, I almost immediately noticed a chunk of my screen was missing around the edges, a problem known as overscan (and similar to one about which I blogged in April). Overscan also tends to stretch the screen image, causing things to appear a bit fuzzy.
As it happens, these monitors default to a display mode that has a considerable amount of overscan, apparently for the purpose of working with non-computer A/V inputs. In my case, however, video comes straight from the DisplayPorts on my Mac, so I want to display “1080p” as a full 1920x1080 resolution.
Fortunately, correcting this issue is very straightforward:
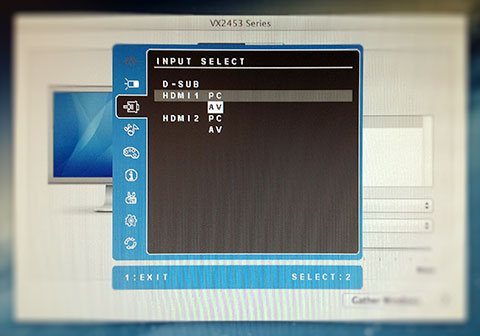
- Open the “on-screen display” (OSD) of the monitor you’d like to correct by pressing the “1” button on the side of the monitor.
- Select the “Input Select” option with the “2” button.
- Use the up/down buttons to select “PC” next to either “HDMI1” or “HDMI2”, depending on which input you’re using. In this screen, “AV” is the “overscan” mode we’d like to avoid.
- Press “2” again to select this mode. The screen will blink briefly while the change takes effect…and you’re done!
Though I’ve used this method on a VX2453mh specifically, I imagine it applies to other monitors of the same family, as well. If you’ve succeeded—or failed!—on another ViewSonic monitor, let me know in the comments!